Development
The first thing that should be mentioned is that the webserver that is integrated into Sanic is not just a development server.
It is production ready out-of-the-box, unless you enable in debug mode.
Debug mode#
By setting the debug mode, Sanic will be more verbose in its output and will disable several run-time optimizations.
# server.py
from sanic import Sanic
from sanic.response import json

app = Sanic(__name__)

@app.route("/")
async def hello_world(request):
    return json({"hello": "world"})
sanic server:app --host=0.0.0.0 --port=1234 --debug
Danger
Sanic's debug mode will slow down the server's performance, and is NOT intended for production environments.
DO NOT enable debug mode in production.
Automatic Reloader#
Sanic offers a way to enable or disable the Automatic Reloader. The easiest way to enable it is using the CLI's --reload argument to activate the Automatic Reloader. Every time a Python file is changed, the reloader will restart your application automatically. This is very convenient while developing.
Note
The reloader is only available when using Sanic's worker manager. If you have disabled it using --single-process then the reloader will not be available to you.
sanic path.to:app --reload
You can also use the shorthand property
sanic path.to:app -r
If you have additional directories that you would like to automatically reload on file save (for example, a directory of HTML templates), you can add that using --reload-dir.
sanic path.to:app --reload --reload-dir=/path/to/templates
Or multiple directories, shown here using the shorthand properties
sanic path.to:app -r -R /path/to/one -R /path/to/two
Development REPL#
The Sanic CLI comes with a REPL (aka "read-eval-print loop") that can be used to interact with your application. This is useful for debugging and testing. A REPL is the interactive shell that you get when you run python without any arguments.
You can start the REPL by passing the --repl argument to the Sanic CLI.
sanic path.to.server:app --repl
Or, perhaps more conveniently, when you run --dev, Sanic will automatically start the REPL for you. However, in this case you might be prompted to hit the "ENTER" key before actually starting the REPL.
sanic path.to.server:app --dev
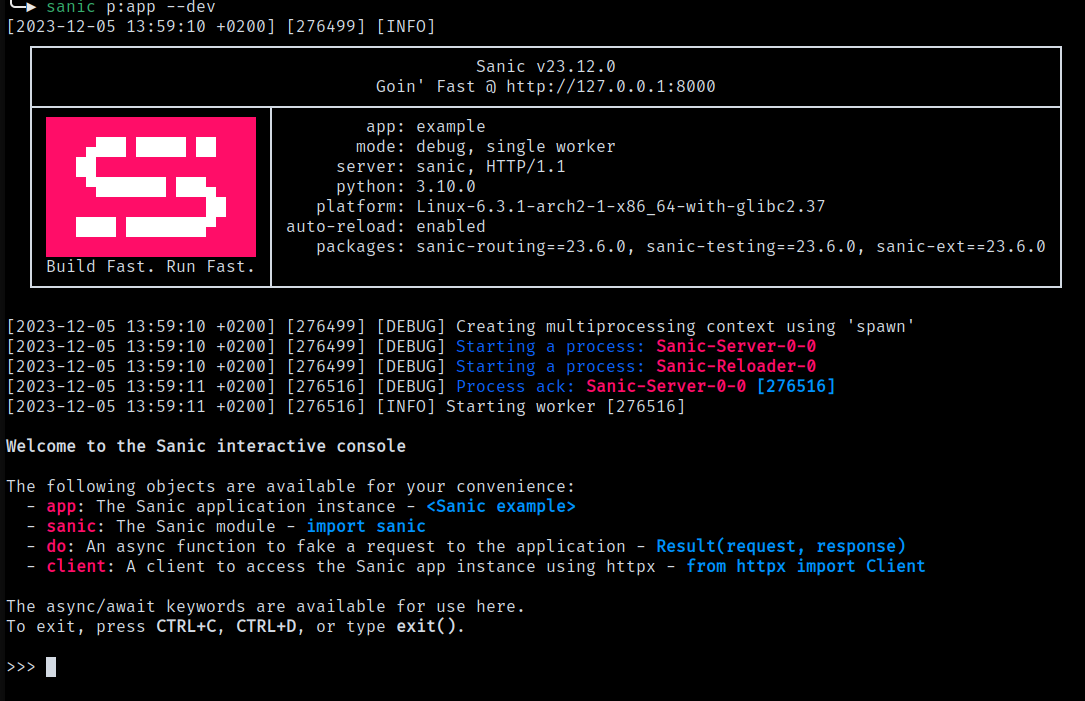
As seen in the screenshot above, the REPL will automatically add a few variables to the global namespace. These are:
app- The Sanic application instance. This is the same instance that is passed to thesanicCLI.sanic- Thesanicmodule. This is the same module that is imported when you runimport sanic.do- A function that will create a mockRequestobject and pass it to your application. This is useful for testing your application from the REPL.client- An instance ofhttpx.Clientthat is configured to make requests to your application. This is useful for testing your application from the REPL. Note: This is only available ifhttpxis installed in your environment.
Async/Await support#
The REPL supports async/await syntax. This means that you can use await in the REPL to wait for asynchronous operations to complete. This is useful for testing asynchronous code.
>>> await app.ctx.db.fetchval("SELECT 1")
1
The app variable#
You need to keep in mind that the app variable is your app instance as it existed when the REPL was started. It is the instance that is loaded when running the CLI command. This means that any changes that are made to your source code and subsequently reloaded in the workers will not be reflected in the app variable. If you want to interact with the reloaded app instance, you will need to restart the REPL.
However, it is also very useful to have access to the original app instance in the REPL for adhoc testing and debugging.
The client variable#
When httpx is installed in your environment, the client variable will be available in the REPL. This is an instance of httpx.Client that is configured to make requests to your running application.
To use it, simply call one of the HTTP methods on the client. See the httpx documentation for more information.
>>> client.get("/")
<Response [200 OK]>
The do function#
As discussed above, the app instance exists as it did at the time the REPL was started, and as was modified inside the REPL. Any changes to the instance that cause a server to be reloaded will not be reflected in the app variable. This is where the do function comes in.
Let's say that you have modified your application inside the REPL to add a new route:
>>> @app.get("/new-route")
... async def new_route(request):
...     return sanic.json({"hello": "world"})
...
>>>
You can use the do function to mock out a request, and pass it to the application as if it were a real HTTP request. This will allow you to test your new route without having to restart the REPL.
>>> await do("/new-route")
Result(request=<Request: GET /new-route>, response=<JSONResponse: 200 application/json>)
The do function returns a Result object that contains the Request and Response objects that were returned by your application. It is a NamedTuple, so you can access the values by name:
>>> result = await do("/new-route")
>>> result.request
<Request: GET /new-route>
>>> result.response
<JSONResponse: 200 application/json>
Or, by destructuring the tuple:
>>> request, response = await do("/new-route")
>>> request
<Request: GET /new-route>
>>> response
<JSONResponse: 200 application/json>
When to use do vs client?#
Use do when ...
- You want to test a route that does not exist in the running application
- You want to test a route that has been modified in the REPL
- You make a change to your application inside the REPL
Use client when ...
- You want to test a route that already exists in the running application
- You want to test a route that has been modified in your source code
- You want to send an actual HTTP request to your application
Added in v23.12
Complete development mode#
If you would like to be in debug mode and have the Automatic Reloader running, you can pass dev=True. This is equivalent to debug + auto reload + REPL.
Added in v22.3
sanic path.to:app --dev
You can also use the shorthand property
sanic path.to:app -d
Added to the --dev flag in v23.12 is the ability to start a REPL. See the Development REPL section for more information.
As of v23.12, the --dev flag is roughly equivalent to --debug --reload --repl. Using --dev will require you to expressly begin the REPL by hitting "ENTER", while passing the --repl flag explicitly starts it.
Before v23.12, the --dev flag is more similar to --debug --reload.
If you would like to disable the REPL while using the --dev flag, you can pass --no-repl.
sanic path.to:app --dev --no-repl
Automatic TLS certificate#
When running in DEBUG mode, you can ask Sanic to handle setting up localhost temporary TLS certificates. This is helpful if you want to access your local development environment with https://.
This functionality is provided by either mkcert or trustme. Both are good choices, but there are some differences. trustme is a Python library and can be installed into your environment with pip. This makes for easy envrionment handling, but it is not compatible when running a HTTP/3 server. mkcert might be a more involved installation process, but can install a local CA and make it easier to use.
You can choose which platform to use by setting config.LOCAL_CERT_CREATOR. When set to "auto", it will select either option, preferring mkcert if possible.
app.config.LOCAL_CERT_CREATOR = "auto"
app.config.LOCAL_CERT_CREATOR = "mkcert"
app.config.LOCAL_CERT_CREATOR = "trustme"
Automatic TLS can be enabled at Sanic server run time:
sanic path.to.server:app --auto-tls --debug
Warning
Localhost TLS certificates (like those generated by both mkcert and trustme) are NOT suitable for production environments. If you are not familiar with how to obtain a real TLS certificate, checkout the How to... section.
Added in v22.6